|
Mention the term glazing, and
most people think of raised panel doors, and kitchen cabinets. Glaze, however,
can also be used to recreate aging, graining and other decorative effects.
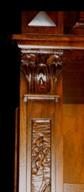
Glazes are really just heavy bodied stains that are applied over a sealed surface. Because they are thick, they often get packed into the creases and crevices
created by the moldings and carvings. This accentuates the depth of the moldings, and helps recreate the look of antique furniture. Glazes can be worked with brushes, grain combs, rolled rags and even crumpled newspaper to get the desired
effect.
NOTE: When using Glazes, it should be noted that the
adhesion of sealer and lacquer coats will be affected by amount of Glaze left on
the surface. In most cases the piece being glazed should not be employed in high wear areas. Actual finish durability may vary due to application
techniques. Remember also that glazing is a hand process; there is bound to be some variation among the individual pieces. This is part of the look.
This is important information. You should inform your customers, maybe even in writing.
The Glazing Process
-
There is a definite increase in the number of customers requesting glazed colors. While glazing is not particularly difficult, it does
require a few extra steps, and there are a couple of rules.
-
The when used full strength the
M.L.Campbell N220 glaze must be sandwiched between two thin layers of C100-25 Water White Vinyl Sealer.
-
Full strength the N 220 glaze has a 6
hour recoat window. This is very important. Apply the second vinyl wash coat applied within 6 hours of
the glaze application. Once the glaze has lost its shine apply the
washcoat. It is better to shoot too soon rather than too late.
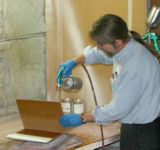
The Traditional Oil Based Glazing process for a stained raised panel door is as follows:
-
Brush a light coat of glaze onto the door; make sure glaze gets into the
cracks and on all four edges.
-
The solvents in the glaze will flash off, and the glaze will turn
dull. This can take 5-20 minutes. When the glaze has dried the appropriate length of time, lightly wipe the excess, leaving the desired amount on the door; probably leaving a little more in the cracks
and corners.
-
The longer you let the glaze sit, the more the glaze is going to
stick to the wood.
-
Don’t forget the edges, and don’t get any on the back of the door.
-
When you want the glaze to stick a little more in the pore of woods
like oak, you can wire brush the wood before you sand it to open up the pores. Wiping the glaze across the grain will also help pack the glaze into the pore; wiping with the grain will tend to pull the graze out of the pore.
-
After you have wiped the glaze to the desired effect, gently dry
brush the door, following the grain, to feather out the glaze and give it a nice finished look. Use a good quality 4” natural bristle varnish brush, something like a 4” Purdy works very well and is worth the investment. Wipe the brush
often with a clean rag to keep the bristles clean. When glazing is completed, wash brush in mineral spirits, and spin dry.
-
Watch out for fingerprints, front and back.
Some things that can make the process go smoother.
-
Whenever you apply or work the glaze, have the door sit on sticks or
blocks to raise it above the work surface. This allows you to wipe under the edge of the door to make sure that there are no runs or drips on the back side.
-
Whenever practical, pair up matching doors or doors / drawers, and
glaze them together. This reduces the possibility of having a dark door right next to a light door.
-
After you apply the glaze, lay the doors out so you can check them
and work the glaze at the proper time.
-
Once the door is worked and checked, it can be placed on your rack
to dry.
-
Check the doors occasionally to see if they are dry. If you are
doing a large job, apply the second washcoat every time you get a few doors dry enough. You don’t want to miss that 6 hour window. Keep track of your drying times.
-
For the most consistent results, have only one person removing and
working the glaze.
Traditional Oil Based Glaze over a Clear Finish
-
After staining, seal the wood with 1 full wet coat of Vinyl Sealer.
-
Lightly scuff sand with maroon ScotchBrite.
-
Apply Glaze for desired effect.
-
After the desired effect is obtained, the glaze should dry and be
sealed with a second coat of
Vinyl Sealer within a 6 hour period. If within the first 6 hours the Glaze is not dry, and is still sticky recoating is not possible. You must wait at least
72 hours before wash coating, or lifting could occur.
-
Lightly scuff washcoat with maroon ScotchBrite.
-
Apply topcoat of a non-yellowing finish.
If you are applying any type of pigmented coating to MDF take note that the edges and profiles should be sanded with 400 and then 600 grit Silicon Carbide
sandpaper. Courser paper tends to pull out the wood fibers from the MDF binder so you may end up with more pits in the surface.
Traditional Oil Based Glaze over a Pigmented Finish
-
Tint primer to desired background color. Apply 1 coat
of pigmented primer.
-
Scuff sand with 320 grit.
-
Apply 2nd coat of pigmented
primer.
-
Apply a coat of Vinyl Sealer.
-
NOTE: When applying a Vinyl Sealer over a Pigmented Coating, the Pigmented
Coating should be sanded very carefully to avoid having sanding scratches
telegraph thru the vinyl. Glaze would get stuck in these scratches.
-
Apply Glaze for desired effect. After the desired effect is obtained the glaze should dry and be sealed with
a second coat of Vinyl Sealer within a 6 hour period. If within the first 6 hours the Glaze is not dry, and is still sticky, recoating is not possible. You must wait at least
72 hours before wash coating, or lifting could
occur.
-
Lightly scuff washcoat with maroon ScotchBrite.
-
Apply topcoat of a non-yellowing finish.
|